

A natural homemade yogurt is still the best. Learn how to make your own yogurt.
Chances are you’ve noticed a trend in the dairy product section of your favorite supermarkets or health food stores. Bottles of fresh milk on one shelf and a couple of sour cream and cheese on a small section, but a hefty amount of space for a fermented milk product any health-conscious person with a taste for a tangy or sour but yummy treat is very familiar with: yogurt. Whether sweetened or flavored, strained, or mixed with fruit or fruit jam on the bottom, there are now innumerable delightful yogurt options to choose from. However, many of these products also contain other ingredients i.e. sugar which are not so healthful. Pure yogurt is what you should be seeking and you can always sweeten it with raw honey if desired.
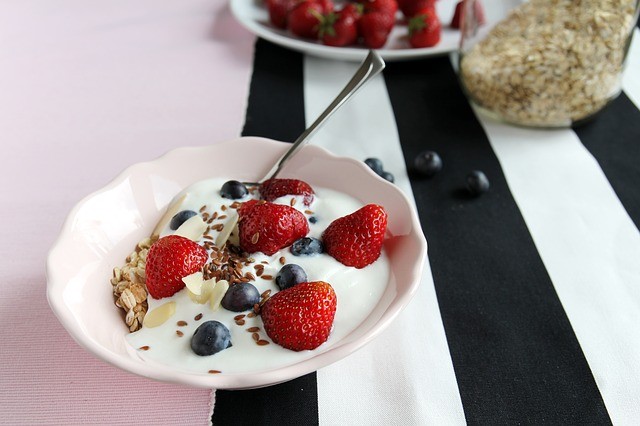
Anyone can enjoy the health benefits of yogurt by making their own version at home at half the cost of those sold in stores – and also, without the packaging waste! Technicalities aside, yogurt can be made by introducing bacteria culture into milk and letting the milk be incubated at a certain temperature until firm. Oh, and then you can add delicious organic fruit like the raspberries in our image.
Recipe: DIY Yogurt
Makes approximately 4 cups of yogurt. Recipe and instructions slightly adapted from Epicurious.
What You’ll Need:
- Heavy, large pot or microwavable container (for warming milk)
- Candy thermometer, preferably with clip for attaching to the side of the pot
- Large bowl
- Small bowl
- Whisk or large spoon
- Ladle
- Storage containers
- Incubator (see above)
- Cheesecloth and colander for straining (optional, see step #9)
And of course, the actual ingredients:
- 1 quart (4 cups) milk
- 3 tablespoons starter (plain yogurt or powdered yogurt starter (see above)
- Thickeners (optional, see above)
- Flavorings and toppings (optional, see above)
What to Do:
- Set up.a. Clean and sterilize your equipment, tools, and work surface. There are two ways to do this: Use the “sanitize” setting on the dishwasher, or sterilize everything with boiling water. Set out all the equipment for easy access.b. Prepare an ice bath. Simply fill the large bowl or (clean!) sink with ice.c. Set up the candy thermometer. Attach it to the heavy, large pot. The tip should be low enough to be covered a bit by the milk, but should not touch the bottom of the pan.
- Heat the milk. Add the milk to the large pot, and place over medium heat. Heat the milk until it reaches at least 180 degrees (or begins to boil). Make sure to stir occasionally to prevent a “skin” from forming, and watch to make sure the milk doesn’t reach a roiling boil or boil up toward (or over!) the edges of the pot. (Not into the stove thing? Use the microwave, instead! Place the milk in a large microwave-safe bowl or a large glass measuring cup with a spout (for easy pouring) and microwave it in 2- to 3-minute intervals, until it reaches 180 degrees or boils.)
- Cool the milk.a. Once the milk reaches 180 degrees, remove it from the heat and allow it to cool to 110 or to 115 degrees.b. To speed the cooling process, place the large pot in the ice bath, stirring the milk occasionally. If the milk temperature drops below 110 degrees, return it to the heat.
- Add the starter. Once the milk reaches between 110 and 115 degrees, it’s time to add the starter culture.a.For yogurt starter: In the small bowl, combine about 1 cup of the warm milk with the yogurt and stir to combine. Add the yogurt-milk mixture to the pot and stir gently until completely incorporated.b. For powdered starter: Follow the manufacturer’s instructions! This will involve adding the specified amount of powdered culture to the warm milk, and whisking gently until the powder has dissolved completely.Note: If using thickeners, add them now, too! To thicken: Whisk in 3 or 4 tablespoons of nonfat powdered dry milk. Or, if using pectin or gelatin, just follow the instructions on the package.
- Get prepped for incubation.a. First, pour or ladle the warm mixture into a thermos (if going with that method), or a covered heat-safe container (if using the microwave, oven, or crock pot method).b.During incubation, you’ll want to keep the mixture at a temperature of 100 to 110 degrees Fahrenheit. Note: If the milk’s temperature drops below this threshold during incubation, it should still be fine; your yogurt just might have a looser texture.
- Now it’s time to incubate.a. If using a thermos: Simply warm up the inside by swirling around hot tap water inside before adding the yogurt. (Pour out the water first, obviously!). Wrap the container in a towel or blanket and leave it somewhere that it won’t be disturbed.b. If using the oven: Warm the oven to about 115 degrees (if your oven doesn’t have a low temperature setting, just set it to the lowest temperature possible and allow it to heat up for a bit). Turn the oven off. Set the container in the oven.c. If using a crockpot: Heat the crockpot to about 115 degrees, then unplug it. (If it only has high and low settings, just use one of them to get the pot warm, and then turn it off.). Wrap the yogurt-filled container in a towel and let it sit, covered, inside the crock pot.d. If using the microwave: Cover the bowl and swaddle it in a few towels to help retain heat. Pro tip: If you have a heating pad, feel free to heat it up and put it underneath or beside the container to further ensure it stays warm.e. If using a heating pad: Set the heating pad to low heat and wrap it around the container, or set the covered container on top of the heating pad and wrap a few towels around the container—the goal is to distribute the heat as evenly as possible around the yogurt. This option might be a bit slower than the others; don’t be shocked if the yogurt needs to sit for upwards of ten hours.
- Let it set. Five hours is the minimum amount of time required for incubation, but you can safely incubate for longer—even overnight. The longer the incubation period, the thicker and tarter the yogurt. After five hours, the yogurt is basically “done” when you want it to be. The texture should be creamy, and the flavor will be tart. Take a taste! If you like it, stop incubating. If you’d like it to be tangier, let it incubate for a few more hours. If you want the yogurt to be thicker, follow the instructions in step #9 once you’ve finished incubating. Note: Do not disturb or jostle the yogurt during incubation.
- Strain the mixture (optional). Now, if you want to make a thicker, Greek-style yogurt, follow these steps (if you want to keep it traditional, skip to the next step!). For thicker yogurt: After incubation, spoon the yogurt into a cheesecloth-lined colander set over a bowl Cover with plastic wrap and let it drain in the refrigerator for at least one hour or overnight (probably closer to overnight). If you want extra thick yogurt—think Fage- or Chobani-esque—use a double layer of cheesecloth or a coffee filter, and allow the mixture to strain overnight. Discard the whey that drains out of the yogurt (or reserve it for another use!).
- Transfer the yogurt to storage containers. Covered glass, ceramic, or plastic containers work well. Or just cover the yogurt in the bowl and refrigerate until cold (about 2 to 3 hours). If you used a thermos to incubate, be sure to transfer the finished yogurt to a non-insulated container for chilling so the temperature will drop.)
- Add flavorings (optional). After the yogurt has fully set and cooled, feel free to add flavorings and mix-ins! Or, store plain and top with extras right before serving.
The yogurt should last for approximately two weeks, though it will have the best flavor during the first week and will become more tart as it ages. If more whey separates out of the yogurt while it’s in the fridge, just stir the whey back in before serving. Enjoy!
Sources:
http://greatist.com/health/make-your-own-homemade-yogurt-how-to-diy


Recent Comments